After you attach a new data disk to a Windows ECS instance, you cannot use it to store data immediately. You must initialize the disk by creating a partition and a file system before you can read from or write to it. This topic describes how to initialize a data disk that is 2 TiB or smaller on a Windows operating system.
Prerequisites
You have created an empty data disk. For more information, see Add a data disk (Linux).
NoteData disks that are created with a Windows instance from the instance purchase page are automatically initialized. You can use them immediately after creation without following the steps in this topic.
The data disk is attached to the ECS instance and is in the In Use state. For more information, see Attach a data disk.
Background information
The following table describes the sample configurations. Adjust them as needed.
Operating system | Resource | Description |
Windows | Image of the ECS instance | Windows Server 2016 64-bit |
Data disk |
|
Procedure
Connect to the ECS instance.
For more information, see Connect to a Windows instance using Workbench.
On the Windows Server desktop, right-click the
 icon, and then click Disk Management.
Find the data disk to initialize. In this example, Disk 1 is in the Offline state.

Right-click the Disk 1 area and select Online.
When Disk 1 is online, its status changes to Not Initialized.

Right-click the Disk 1 area and select Initialize Disk from the pop-up menu.
In the Initialize Disk dialog box, select the target disk and the partition style, and then click OK.
ImportantThe Master Boot Record (MBR) partition style does not support disks larger than 2 TiB. If your disk is larger than 2 TiB or you plan to expand it to more than 2 TiB, use the GUID Partition Table (GPT) partition style.

Right-click the Unallocated area of Disk 1 and select New Simple Volume.

In the New Simple Volume Wizard dialog box, complete the following steps.
In the Specify Volume Size step, specify the Simple Volume Size, and then click Next.
To create only one primary partition, use the default value. You can also set a custom simple volume size to divide Disk 1 into multiple partitions.

In the Assign Drive Letter Or Path step, select Assign The Following Drive Letter, select a drive letter (D is used in this example), and then click Next.

In the Format Partition step, select Format This Volume With The Following Settings, configure the format settings, and then click Next.
ImportantCarefully select the Allocation Unit Size. This setting cannot be changed after it is set. For information about disk capacity limits, see NTFS overview.
If you plan to expand the disk to a size from 16 TiB to 32 TiB (inclusive), select 8192.
If you plan to expand the disk to a size from 32 TiB to 64 TiB (inclusive), select 16K.
In other cases, keep the default value.

Review the settings for the new simple volume and click Finish to close the New Simple Volume Wizard.
Result
After the initialization is complete, the status of Disk 1 in Disk Management is displayed as shown in the following figure.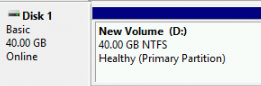
In This PC, the new drive is displayed as New Volume (D:). The data disk is now ready to use.
References
If a disk runs out of storage space, you can expand the disk to increase its capacity. For more information, see Overview of disk expansion.